| 일 | 월 | 화 | 수 | 목 | 금 | 토 |
|---|---|---|---|---|---|---|
| 1 | 2 | 3 | 4 | 5 | 6 | 7 |
| 8 | 9 | 10 | 11 | 12 | 13 | 14 |
| 15 | 16 | 17 | 18 | 19 | 20 | 21 |
| 22 | 23 | 24 | 25 | 26 | 27 | 28 |
- swift
- Bitcode
- UITableView
- Check
- push
- simulator
- 해몽
- 스마트폰
- swift3
- 보라카이
- error
- UIView
- GCD
- 아이폰7
- IOS
- 샘플
- 페이백
- Xcode
- Example
- 포켓볼
- 앱스토어
- 신도림
- 공략
- LG유플러스
- afterdelay
- 얻는법
- setting
- 신도림 테크노마트
- loop
- 포켓몬 GO
- Today
- Total
도래울
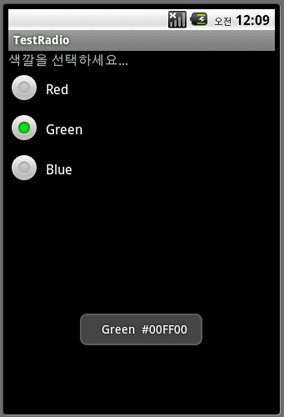
Android RadioGroup 예제 본문
<?xml version="1.0" encoding="utf-8"?>
<LinearLayout xmlns:android="http://schemas.android.com/apk/res/android"
android:orientation="vertical"
android:layout_width="fill_parent"
android:layout_height="fill_parent"
>
<TextView
android:layout_width="fill_parent"
android:layout_height="wrap_content"
android:text="색깔을 선택하세요..."
android:textSize="7pt"/>
<RadioGroup // RadioGroup로 RadioButton을 묶는다
android:id="@+id/RadioGroup01"
android:layout_width="wrap_content"
android:layout_height="wrap_content">
<RadioButton
android:id="@+id/RadioButton01"
android:layout_width="wrap_content"
android:layout_height="wrap_content"
android:text=" Red"
android:tag="1"/> // Tag는 선택된 버튼을 구별하기 쉽게하기 위해 사용
<RadioButton // 연습삼아 Tag를 설정해 본다
android:id="@+id/RadioButton02"
android:layout_width="wrap_content"
android:layout_height="wrap_content"
android:text=" Green"
android:tag="2"/>
<RadioButton
android:id="@+id/RadioButton03"
android:layout_width="wrap_content"
android:layout_height="wrap_content"
android:text=" Blue"
android:tag="3"/>
</RadioGroup>
</LinearLayout>
package com.TestRadio;
import android.app.Activity;
import android.os.Bundle;
import android.widget.*;
import android.widget.RadioGroup.OnCheckedChangeListener;
public class TestRadio extends Activity {
/** Called when the activity is first created. */
@Override
public void onCreate(Bundle savedInstanceState) {
super.onCreate(savedInstanceState);
setContentView(R.layout.main);
RadioGroup rGroup = (RadioGroup) findViewById(R.id.RadioGroup01);
// RadioGroup의 OnCheckedChange를 이용하면 하나의 이벤트로 라디오버튼을 모두 식별할 수 있다
rGroup.setOnCheckedChangeListener(new OnCheckedChangeListener() {
public void onCheckedChanged(RadioGroup rgroup, int id) { // 선택된 라디오버튼의 id가 넘어오므로 이걸 이용한다
RadioButton rButton;
String s = "";
int n;
rButton = (RadioButton) findViewById(id); // id 로 선택한 버튼 찾기
n = Integer.parseInt(rButton.getTag().toString()); // 버튼의 Tag로 서로 다른 처리를 하려면 이렇게...
switch (n) { // 태그를 이용하지 않고 Id 를 이용할 수도 있다
case 1 : s = "#FF0000"; break; // switch(id) case R.id.RadioButton01 : ~
case 2 : s = "#00FF00"; break;
case 3 : s = "#0000FF";
}
Toast.makeText(TestRadio.this, rButton.getText() + " " + s, 0).show();
}
});
}
}

'개발 > Android' 카테고리의 다른 글
| 안드로이드, 개발, 정보, 메서드 (0) | 2016.02.05 |
|---|---|
| 안드로이드 프로그램 샘플 모음 (0) | 2016.02.05 |
| Activity 사이에 자료를 전달하는 예제 (0) | 2016.02.05 |
| Android Emulator 단축키 (0) | 2016.02.05 |
| 안드로이드 2.0 SDK + 이클립스 3.5 개발환경 설정 방법 (0) | 2016.02.05 |
